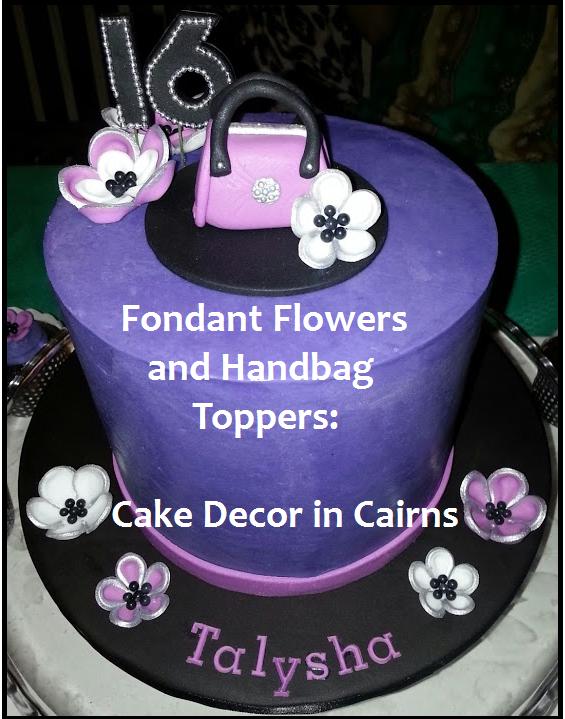
How I made My Fondant Flower and Handbag Toppers!
OMGOSH! I am feeling a little overwhelmed to wake up today, to so many notifications, likes, comments shares, pluses... and then to discover they came from Way Beyond Cakes by Mayen!!!! I never dreamed one of my favourite mega huge cake pro's would even notice a tip from my very amateur home baking page! I mean EEEEK! have you seen how many followers she has? Check out her facebook page!
Yes that's really how my mind races through ideas and suddenly I have the whole cake in my mind. Now I might add, they don't always turn out the way I had planned, but this one, this awesome cake is one of those fixed points in time that I will always refer back to when I am starting to self doubt my ideas.
 The last flower I tried was one of these rose cutters, it seemed like a great shape on it's own - kind of like a funky animated type flower, but still a little flat for what I wanted. I pulled out this bendy tool thingy (which I found out later is called a "Bone Tool") and started rolling out from the edge back towards the centre - I was going for a look I had seen on other flowers but I didn't get that look and was about to scrunch up the fondant yet again when I realised hang on, that looks kind of funky! Rose Cutter and Bone Tool became the stars of the day. Match it with my cheap flower formers and I was ready to roll.
Gosh, just goes to show that no matter who you are or where you come from, we can all inspire and motivate each other in so many different ways. I know others may have already done this before, (My Coloured Ganache Recipe) but I had not seen it on any of the wonderful cake decorating pages I follow and love (and that's a heck of a lot of pages, trust me!) And I gotta say by the flippin amazing response I have received, I wasn't alone in not seeing this technique before!
So before I get stuck into my fondant flowers tutorial as promised, I want to give the hugest THANK YOU to not only Mayen and my other favourite pages like Couture Cakes by Rose, but also to all of you who took the time to Read, Like and Share - I feel so privileged that you took the time out to share a little piece of me with the world. ♡
Fondant Flowers & Mini Handbag Toppers My way
These uber cute fondant flowers were pretty much a last minute decision. I had been super crazy busy all week and almost forgot my baby niece was turning 16. Oh and let me say I am still in denial that my baby girl is 16 now! She was such a little cutie pie and it seems like only yesterday she was calling me Aunty Omi in her cutest teeny baby voice. She can't be 16! That would make me... um so old!!
So after a quick chat with my sister, her instructions were "something purple." I paused for a moment and thought to myself "What? You give me two days to make a cake and all you can say is purple??" She then added "Oh I know you're awesome and will love whatever you do, we don't mind if it's just a plain cake."
So my mind started ticking...
Plain Cake
Purple
Simple
Sixteen 16
Gorgeous♡
Flowers Handbag
Bling
Coloured Ganache!!
So moving right along, the first step of my ganache had been made and was patiently sitting on my bench waiting to complete the first setting process. I went through 6 different shaped flower colours, tried rolling the petals, placing them in formers - um no. None of these said gorgeous and 16. They all screamed old fashioned, wedding or just plain boring!! Yes you're beginning to see I often have conversations with my cake decorating tools and arguments with fondant! Quite an interesting time to be had in my kitchen!
 The last flower I tried was one of these rose cutters, it seemed like a great shape on it's own - kind of like a funky animated type flower, but still a little flat for what I wanted. I pulled out this bendy tool thingy (which I found out later is called a "Bone Tool") and started rolling out from the edge back towards the centre - I was going for a look I had seen on other flowers but I didn't get that look and was about to scrunch up the fondant yet again when I realised hang on, that looks kind of funky! Rose Cutter and Bone Tool became the stars of the day. Match it with my cheap flower formers and I was ready to roll.
But hang on, what about the cute little handbag? Well I have to tell you the handbag was not my idea! After Googling a lot of online tutorials I found this perfectly easy one by Bake Happy which really, you should just go and check out. I did a few things differently though so it's not quite the same, but the general idea is there.
 |
| Inserted some tissue to support drying. |
- I didn't use a silicone button mould, instead I cut a small circle and glued on the petit dragees, followed by a quick brush of silver edible paint.
- I used an embossing mat to gently imprint a little texture to the bag.
- I chose to paint my zipper silver
- I also found that my handles kept falling down so I supported them with tissue whilst drying.
Funky Flowers Instructions
Equipment
Rose Cutter Set
Bone Tool
Rolling Pin & Mat
Rolling Pin & Mat
Flower Formers
Black Mini pearls
CMC / Tylose Glue
Edible Paint & Brush (Optional)
Petal Pad (Optional, it will work just fine on a silicone mat)
Now follow the photo instructions. If you have any questions please leave a comment further below.
 |
| Roll out your fondant treated with CMC or use gumpaste. Cut out your flower. |
 |
| Using the Bone Tool press from the inner petal edge, pushing down towards the centre. |
 |
| Using edible glue, dab the centre of each flower lightly and attach your sugar pearls. |
 |
| *Optional if you want to add a little shine, paint the edges after the flowers have dried and BEFORE you glue the pearls in. |
 |
| Leave to dry overnight in your chosen formers. |
Once you've made the basic single flower you might like to also play around with different colour combinations and layer different sized flowers on top of each other.
I hope you enjoy making these as much as I loved making them for my niece!
I hope you enjoy making these as much as I loved making them for my niece!
Share ♡ Inspire ♡ Motivate :: Home Bakers Doing it for Themselves.


Comments
Post a Comment
I would love to hear your comments! ♥