Heart of Te Fiti Cake: You know Who You Are...
"I have crossed the horizon to find you
I know your name
They have stolen the heart from inside you
But this does not define you
This is not who you are
You know who you are"
Lyrics from "Moana"
Lin-Manuel Miranda and Mark Mancina
Ahhh Moana! Such a feel good family story and definitely our family's current favourite Disney Movie! And I will say, my niece is just the cutest when she is belting out songs in the backyard:
So it was no surprise that my niece wanted a Moana themed cake! We brainstormed a few ideas which included a quick Google - and anyone who has asked Google for a Moana Cake would have most likely seen the amazing Cynthia White's Moana inspired Cakes including the most beautiful Heart of Te Fiti (and not to mention several replicas by other cakers!) To say she is amazing just doesn't seem to give her enough justice. (Oops I feel a cake crush coming on!)
Now if anyone knows my cake style by now, I am not a fan of fondant, I like a tall double barrel / extended single tier and I like to put my own spin on things to create my own piece of home baked edible art. So I went through a really different design process after seeing Cynthia's cake.
First I thought that my favourite scene is actually when Moana returns the heart to Te Fiti. This moment is not just a green swirl in the grass, it's full of light and spectacular renewal. I wanted to capture that moment and this became the focal point of my cake. Oh did I mention I decided all this on Thursday and the party was on Saturday? Last minute much! And this is why I used licensed Disney toys for the figurines - there was simply not enough time to make them out of fondant- however I was super pleased with the cake.
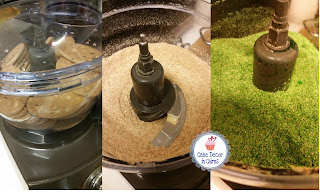
The next step was to figure how the heck I would create edible moss. So guess what I did? Yep Google to the rescue again. I found an incredibly cute blog post over at Semi Sweet on how to make moss for Easter Cookies. It's pretty much the same process for cakes and I adapted it slightly by using a food processor, local store bought biscuits and liquid food colour rather than gel.
For the sand I cheated and used biscuit crumb pie base. I find it has a lovely yellow sand colour. However the plain biscuits blasted in the processor would have been fine (and cheaper,) I just like trying different things out.
1 Packet of plain sweet biscuits
2-3 Tablespoons of liquid Food Colour
Method:
Place biscuits in food processor and pulse until you have a fine crumb.
Add one table spoon of liquid food colour at a time.
Pulse between each addition.
If you do this you should not have any issues of your moss becoming too wet.
I used half the box of biscuit crumbs for the sand on the board and decorated with my edible flowers and shells. Oh and I can't forget the chocolate Moana Cupcakes!! I can't believe I almost forgot to show you those!
"My name is Moana!"
So it was no surprise that my niece wanted a Moana themed cake! We brainstormed a few ideas which included a quick Google - and anyone who has asked Google for a Moana Cake would have most likely seen the amazing Cynthia White's Moana inspired Cakes including the most beautiful Heart of Te Fiti (and not to mention several replicas by other cakers!) To say she is amazing just doesn't seem to give her enough justice. (Oops I feel a cake crush coming on!)
Now if anyone knows my cake style by now, I am not a fan of fondant, I like a tall double barrel / extended single tier and I like to put my own spin on things to create my own piece of home baked edible art. So I went through a really different design process after seeing Cynthia's cake.
First I thought that my favourite scene is actually when Moana returns the heart to Te Fiti. This moment is not just a green swirl in the grass, it's full of light and spectacular renewal. I wanted to capture that moment and this became the focal point of my cake. Oh did I mention I decided all this on Thursday and the party was on Saturday? Last minute much! And this is why I used licensed Disney toys for the figurines - there was simply not enough time to make them out of fondant- however I was super pleased with the cake.
The next step was to figure how the heck I would create edible moss. So guess what I did? Yep Google to the rescue again. I found an incredibly cute blog post over at Semi Sweet on how to make moss for Easter Cookies. It's pretty much the same process for cakes and I adapted it slightly by using a food processor, local store bought biscuits and liquid food colour rather than gel.
For the sand I cheated and used biscuit crumb pie base. I find it has a lovely yellow sand colour. However the plain biscuits blasted in the processor would have been fine (and cheaper,) I just like trying different things out.
Edible Moss Recipe
Ingredients:
2-3 Tablespoons of liquid Food Colour
Method:
Place biscuits in food processor and pulse until you have a fine crumb.
Add one table spoon of liquid food colour at a time.
Pulse between each addition.
If you do this you should not have any issues of your moss becoming too wet.
 |
| Edible Moss & Sand Ingredients. |
 |
| Process Biscuits, Then Add Food Colour. |
For the the 3D effect heart swirls (yes that's a plural, if you look closely you will see that the heart joins together two swirls in the middle) I just used a piece of fondant with a little CMC added. I started with a naked chocolate ganache cake. The swirls stuck easily to it using some edible glue. The tricky part was getting the moss all over the cake. Normally I would have used a tip that Rose de Guzman-Warnick taught me, chilling the cake thoroughly so the ganache is rock hard and you can roll the cake around, however did I mention I was time poor and I was already incredibly pressed? Every minute counted! I don't have any pictures of my ridiculously messy method, but just imagine a cake covered in piping gel and me trying to pat on the moss with a paint brush - yes I did say it was ridiculous ha ha... however I was still successful in my madness! (Kids Don't try this at home!)
 |
Heart of Te Fiti Before & After Steps
|
After the super tricky covering cake in edible moss part was completed I painted the swirl using Rolkem Fluro edible dusts and added little flowers I had pre-made from my last cake.
 | |
|
Thanks to my friend Alexi at The Cupcake Orchard, I had these super amazing edible images printed free using the fabulous cupcake templates provided by Cupcake Diaries and I placed them on the back of fondant discs. Totally looked awesome!
An extra diary note to self:
I am not going to lie to you - this was crazy doing so much in such a short amount of time. I was so rushed and totally disorganised. What saved me I think, is my confidence in baking and ganaching a cake, it's the most important foundation for me. My blank canvas. Having pre-made items saved and stored from previous cakes is also a work smarter not harder tip from yours truly.
 |
| You Know Who You Are: The Heart of Te Fiti Cake |
Share ♥heart emoticon Inspire ♥heart emoticon Motivate ♥
Home Bakers Doing it For Themselves!


hello
ReplyDelete